
Your social media imagery is like the cover of your book. In this article, we lay out all the banner size and dimension information you need to create a YouTube banner that gets people excited about your channel! So, let’s look at our YouTube banner size guide in 2022 from Render Perfect Productions.
Picture the last time you were perusing shelves at your local bookstore. Was there a book that grabbed your attention? Perhaps that initial visual interest led you to open up the book to see what was inside. No matter which book caught your fancy, chances are good that strong visuals played a role in sparking your curiosity and wanting to know more.
A great YouTube banner is a lot like a great book cover. It grabs your interest and makes you want to look inside. It’s an important part of the way audiences will perceive a YouTube channel. And these days, few businesses can afford to ignore their YouTube channel. According to recent statistics from the social network, people watch more than a billion hours of video per day on YouTube.
In this post, we’ll cover what every business needs to know to create YouTube banners in the correct dimensions and file size for different devices.
YouTube Banner Size
There are a few terms and key concepts to understand about the way images display on different devices, which we’ll get into in the next section. For now, here’s a quick checklist to make sure your banner art meets YouTube’s banner size guidelines:
- YouTube’s Recommended Banner Size is 2560 x 1440 pixels
- Minimum image dimensions: 2048 x 1152 pixels, with an aspect ratio of 16:9
- Minimum image safe area for text and logos: 1235 x 338 pixels
- File size limit: 6MB
YouTube Channel Art Size Guide
Now, let’s dig into the finer points of YouTube channel art size guidelines. First, why so many sizes? In a nutshell, it comes down to how your YouTube banner art will display on the many sized devices people use, from Android to iPhones to TV screens.
You want your YouTube banner to look great whether it’s displayed on the largest-size screen at the full 2560 pixels width down to the smallest-size phone screen – or any size in between. Otherwise, you’re potentially losing views of your videos and new subscribers.
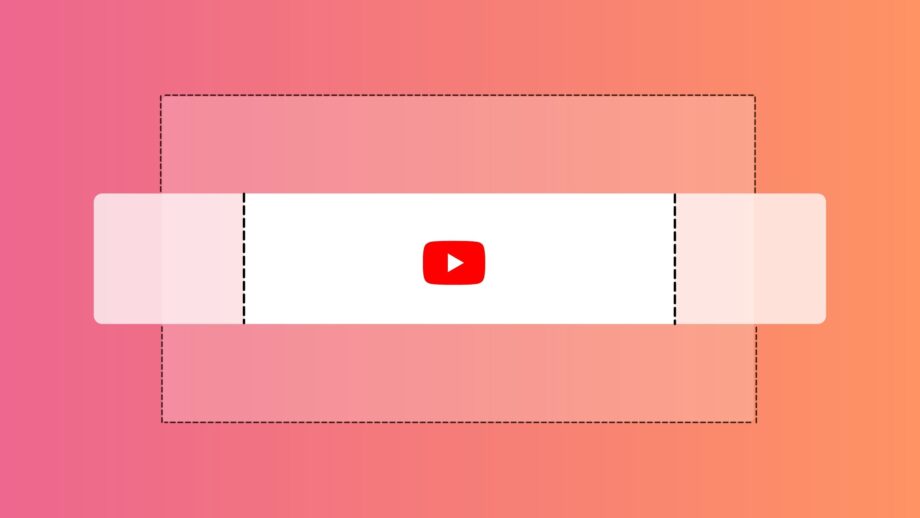
Depending on your image, it’s tricky to get it right on every size screen. But there’s one key that will help make sure your viewers always see your YouTube banner in the right light, and that’s by knowing your “safe area.”
Know your YouTube banner safe area
To ensure your YouTube banner is viewed optimally, you’ll want to understand your “safe area.” If you’re hearing them for the first time, your “safe area” is the minimum area you need to ensure your banner displays correctly.
Make sure any part of your image that’s essential to your YouTube banner is completely within the safe area of 1235 x 338 pixels. You don’t want anything that looks awkward to potential viewers of your YouTube channel, which could turn them off your channel.
About Render Perfect Productions:
Render Perfect has been built from the ground up to service growing businesses and help them realize their full visual storytelling and digital marketing potential. We’ve created a service offering and skill-set that spans video production, post-production, motion graphic design, 3D animation, web development, and video marketing strategy. Our insight and experience allow us to help clients make better planning decisions and get more out of their video production effort.